OBS Streamkit Overlay is a powerful tool for OBS Studio provided by Discord.
By dynamically displaying the status of voice chats and text chats on your streaming screen, you can create a sense of unity with viewers and achieve even more engaging streams.
What is OBS Streamkit Overlay?
OBS Streamkit Overlay is an extension that allows you to overlay the status of Discord voice and text chats on your game screen that is being streamed using OBS Studio.
Main Features
- Voice Chat Display: Displays members currently participating in the voice channel. You can see at a glance who is speaking and who is muted.
- Text Chat Display: Displays messages from a specified text channel in real-time. You can display comments from viewers and interactions between streamers.
- Status Display: Displays the current Discord status (online, away, do not disturb, etc.).
- Invite Link Display: Displays an invite link to the server. Encourages viewers to easily join the server.
Benefits of Implementing Overlay
- Viewer-Participatory Streams: By displaying comments from viewers in real-time, you promote two-way communication and increase the sense of unity.
- Activation of the Streaming Screen: Visually displaying the status of voice and text chats adds movement to the streaming screen and attracts viewers’ attention.
- Community Visualization: Appeals to viewers about the existence of the Discord server and encourages them to join the community.
How to Set Up OBS Streamkit Overlay
Setting up OBS Streamkit Overlay is completed in the following three steps:
Step 1: Installation and Authentication
- Access the Overlay Website: Open the OBS Streamkit Overlay webpage and click “Install Overlay to OBS”.
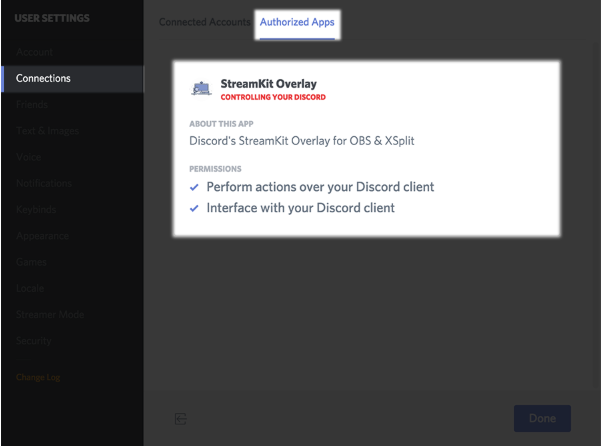
- Allow Access to the Discord Client: Allow the Overlay to access your Discord client and control specific actions. You can check the authorized information in User Settings > Connections > Authorized Apps.
- Permissions Granted to the Overlay: The Overlay requires permissions to perform actions in the client. Specifically, permissions to generate invite links to display on the status widget.
- Confirm Connection with the Blue Banner: When the Overlay is connected to the client and accessing a part of the client, a blue banner will appear at the top of the client window. You can close the banner by clicking on the X in the top right corner.
Step 2: Overlay Customization
- Go to the Customization Page: After authenticating the Overlay in the client, a customization page will appear. Under the OBS logo, there are options to customize three widgets: status, chat, and voice.
- Select a Server: To start the preview, first select the server you want to display on the Overlay from the server drop-down menu.
- Customize Widgets: You can customize the following items for each widget:
- Text color
- Text size
- Text font
- Shadow size
- Background color
- Icon display/hide
- Widget size
- Widget position
- Display channel
Step 3: Implementation in OBS Studio
- Confirm the Installation Panel: Once the Overlay settings are complete, confirm the link in the installation panel.
- Add as a Browser Source: Installation is as simple as copying the link displayed in the installation panel and pasting it as a browser source in OBS Studio. Adjust the height and width to match the dimensions specified on the Overlay website.
- Settings for Each Widget: Each widget is issued a separate installation code, so repeat the installation process for each widget you want to use.
- OBS Studio Version: To add the Overlay, the latest version of OBS Studio must be installed. Download the latest version from the OBS website.
- OBS Classic: If you are using OBS Classic, you can use Streamkit Overlay by downloading the necessary plugins from the OBS website.
How to Implement in OBS Studio
- Copy the Installation Link: Copy the link displayed in the installation panel.
- Add a Browser Source: Click the add source icon and select “Browser”.
- Create a Source: Select “Create New” and give it a name.
- Set Properties: Enter the installation link in the URL box and adjust the height and width as needed.
- Dimensions: Make sure the width and height dimensions you entered are the same as those specified on the Streamkit website.
- Preview: The Overlay will appear live in the stream preview. You can drag and adjust as needed.
Frequently Asked Questions
Q1. Is OBS Streamkit Overlay free to use?
A1. Yes, OBS Streamkit Overlay is free to use.
Q2. What streaming platforms does OBS Streamkit Overlay support?
A2. As long as it supports OBS Studio, it can be used on any streaming platform, such as Twitch, YouTube, and Niconico Live.
Q3. Can I customize the display of OBS Streamkit Overlay?
A3. Yes, you can customize the text color, size, font, shadow size, background color, icon display/hide, etc. on the Overlay website.
Q4. Can I display multiple widgets with OBS Streamkit Overlay?
A4. Yes, you can display all three widgets, status, chat, and voice, simultaneously.
Q5. What should I do if the display of OBS Streamkit Overlay does not work properly?
A5. First, make sure that OBS Studio is the latest version. Also, check that you have granted access to the Overlay in your Discord client and that the browser source settings are correct. If the problem persists, please refer to the Discord Help Center or contact support.
Conclusion
OBS Streamkit Overlay is a powerful tool that allows you to display the status of Discord voice and text chats on your streaming screen, increasing the sense of unity with viewers and achieving more engaging streams.
Please use this article as a reference and utilize OBS Streamkit Overlay to power up your streams.